Custom DLC (Tutorials)
Contents
Custom DLC (Tutorials)
Table of Contents
Extracting the files
How about we start by getting all the files we need first? This is the hard part. This details how to legally get your hand on the files required for the other steps. If you do not care about legal stuff, you may be able to find a pack in an internet close to you.
  This guide is based on Project DIVA extend. There might be slight differences with Project DIVA 2nd.
Required
[[file/view/customdlctuto_1_01.png| ]]
]]
An ISO of Project DIVA 2nd or Project DIVA extend. You can either download one (boo!) or legally dump one (which is also faster). Tutorial.
7zip or another archive program able to extract ISOs. Download here. If you use Linux, file-roller (default in Ubuntu) can do it.
QuickBMS. Works with WINE. Download here.
First, we are going to extract the original modules from the ISO. Open the ISO in 7zip, and browse to /PSP_GAME/USRDIR/media/afs/. Extract "Diva2ExData.cpk" (or "Diva2Data.cpk", this is the one we need. Put it in the same folder you put QuickBMS into.
Now we need to open the command line to use quickbms. Browse to the folder, and use QuickBMS with this command (if you use Linux/Mac, prefix the command with wine to use it):
quickbms.exe cpk.bms Diva2ExData.cpk PDeData
[[file/view/customdlctuto_1_02.png| ]]
]]
If you do not plan to do anything fancy with all the files and just want the files required for this tutorial, use this command instead to only extract the skins:
quickbms.exe -f "/skin*" cpk.bms Diva2ExData.cpk PDeData
If it asks you whether you want to create the folder, answer with Y(es). Now give it some time to extract all the files. If everything went right, you should have a new folder with 2952 files (or 334 if you used the second command).
The files starting with "skin" are the modules, each sepearated into H(ead) and B(ody) parts. That concludes the module extracting, on to the DLC.
Creating Module Combinations
Now here is where the fun part begins! We are going to recombine heads and bodies to create new modules.
Required
PDModuleCPKBuilder. Can be downloaded here, password is 100modules. Works perfect with WINE.


  Open the program, and you will see this. It hardly needs an explaination, but here you go anyways:
 Module Head: This is where the head goes.
 Module Body: And this is where the body goes.
 Slot Number: The Slot the DLC will occupy - make sure it doesn't conflict with another one. To change slots without rebuilding the CPK, use Slot Changer
 Module Name: This is the name which will appear in the Extras menu.
 ReadCapa: This is the amount to space it will take up in Edit Mode.
 Vocaloid: The module will have this Vocaloid's sounds, motions and statistics.
 Head Animation: Choose the one which fits your module's head most. Miku will mostly need Twintails, while Luka needs Long, and Rin needs Short. You can also try to choose other options to get some other effects - for example setting it to Short for Miku Rolling Girl will only leave the left ponytail, similar to Neru.

  Choose your head and body using the Module List. Find the module you want to use, then replace x with h for the head or with b for the body. Fill in the other fields correctly, the hit "Build CPK". That's it, you're done - you can now import the DLC into your game!

Texture Editing
Sometimes just combining is not enough, and you might want to change the color of the clothing to match the new character. This is possible, too!
Required
AFS2EXT. Not compatible with WINE - sorry Mac and Linux users! Available in a pack made by SonicDX, along with PNG Processing Tools, right here. A pack with more addresses for PDe is available here.
|
[[file/view/customdlctuto_3_1.png| |
| 1 |

To start off, open the AFS2EXT folder. If you want to work with a PDe ISO, rename the folder "adrExt" to "adr". If you work with 2nd/2nd#, rename "adr2nd" to "adr". Now you can open AFS2EXT, hit Open at the top, and load your ISO or CPK extracted in Tutorial 1 [1]. Make sure to make a copy of the ISO/CPK before editing anything!
Now find the head/body you want to edit using the Module List. Now we have two cases:
a) You can choose something in the dropdown field below Texture.
b) The dropdown field is greyed out and you can't choose anything.
|
[[file/view/customdlctuto_3_2.png| |
| 2 |

If it's the latter, the texture offsets weren't found yet. You can try to wait or request someone to find it. If it's the former, choose all the textures in the dropdown and hit Extract [2]. Save the texture in a folder where you will be able to find it.
Now you can use your favorite image editor to edit the textures! Personally, I recommend the free and cross-platform GIMP - it takes some time to get used to, but it has an enourmous amount of useful functions and can easily be compared to commercial programs like Photoshop.
|
[[file/view/customdlctuto_3_3.png| |
| 3 |

I'm sure you can do a better edit than me [3].
|
[[file/view/customdlctuto_3_4.png| |
| 4 |

|
[[file/view/customdlctuto_3_6.png| |
| 6 |

When done, copy your textures into the pngnqi folder which came in the same package as AFS2EXT. You can just select all textures and drag them onto one of the BAT files to process all at once [4]. Now repeat it for the other file - the result should be 5 PNG images for every texture [5].
Go back into AFS2EXT now. Instead of hitting Extract, you need to choose Rewrite this time, and select one of the processed PNGs. Usually the .neuquant.dither.png one works fine, so choose it, then switch to the second texture. If you see something
|
|
| 7 |

corrupted like [6], that means this model uses a different PNG format. Reload AFS2EXT with the copy of the ISO/CPK, and try again with one of the
|
|
| 5 |

others until there is no more corruption.
Now insert the second texture the same way, but use the same PNG format as you have used for the first one. This is it, the textures have been successfully inserted! Now hit the upper Extract button to recieve the new IGB, which you can use to create a module as described in Tutorial 2.
Custom DIVA Room Posters [A]
This tutorial only works with Project DIVA extend for now. The resulting DLC works for both games.
Required
AFS2EXT - see above.
  A hex editor. HxD is a good choice for Windows, for Linux I recommend ghex (available on the Ubuntu Software Center, too)
  Any EDAT of an object DLC. You can take a custom one already available, or a official, decrypted one. For this tutorial, I used Accessory 01: Vocaloid & UTAU Poster (Wall).
|
[[file/view/customdlctuto_4_1.png| |
| 1 |

|
[[file/view/customdlctuto_4_2.png| |
| 2 |

First, open AFS2EXT and the PDe data as described in the tutorial above - but instead of choosing a module, take one of the posters [1]. They can be found at ID 2630 to 2641. Find a poster which you'd like to modify, and extract the texture. From here on the process is very similar to Model Texture Editing, so edit the texture and reinsert it using AFS2EXT. Make sure you do not use the white borders - they will not be displayed ingame [2]. The problem is there is no second texture, so you can't immediatly check whether the texture format you chose is the right one. You need to test which one doesn't crash the game. If you are done, extract the IGB.
|
[[file/view/customdlctuto_4_3.png| |
| 3 |

Now open the Hex Editor. Open both the EDAT and the IGB. First, edit the EDAT's slot and name. The slot can be found at Offset 0x1803, and the name is at 0x2000. Select the name to read the length in the status bar, and enter this value at both 0x87A and 0x87E [3].
|
[[file/view/customdlctuto_4_4.png| |
| 4 |

Jump forward to 0x4000, this is where the IGB begins. It goes from 0x4000 to 0xE7FF, so make sure the length of your IGB is small enough to fit there. If not, try another EDAT. Select the entire IGB, copy it, then go back to the EDAT and hit Ctrl+B at 0x4000. This will paste the EDAT and includes overwriting. Now select all data beetween the end of the paste to 0xE7FF, and fill it with 00s. Save the EDAT and drop it onto your Memory Stick (psp:\\PSP\GAME\ULJM05681\H). If the game crashes, you most likely chose the wrong PNG format when rewriting the texture in AFS2EXT, so try again. If it works, congratulations, you just crafted a fine piece of art [4]!
Custom Stage Creation [A]
Right now, Stage Creation allows for the most customization out of the methods - pretty much everything you see in 3D editors works here. This tutorial only contains guidelines on how to make stages work in PD, and is not a tutorial for 3D modeling, so you should have some experience with it.
This tutorial shows everything with Autodesk 3ds Max, but most other 3D modeling programs should work - 3ds Max can import most other formats using plugins. 3ds Max is only required if you want to export the stage to PD yourself.
Axes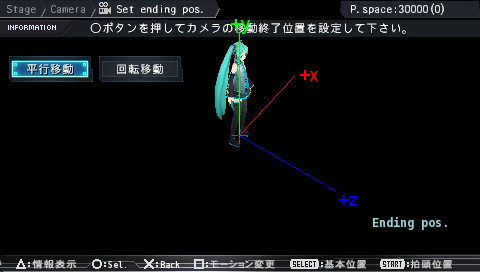

The IGB will be rotated when displayed in PD, by -90° on the X axis.
This means when you look at the stage from the front, you will actually see what will be the bottom. Look at the 3D model from the top to see what the stage will look like from the front.
Sizes[[file/view/customdlc_sizes.png|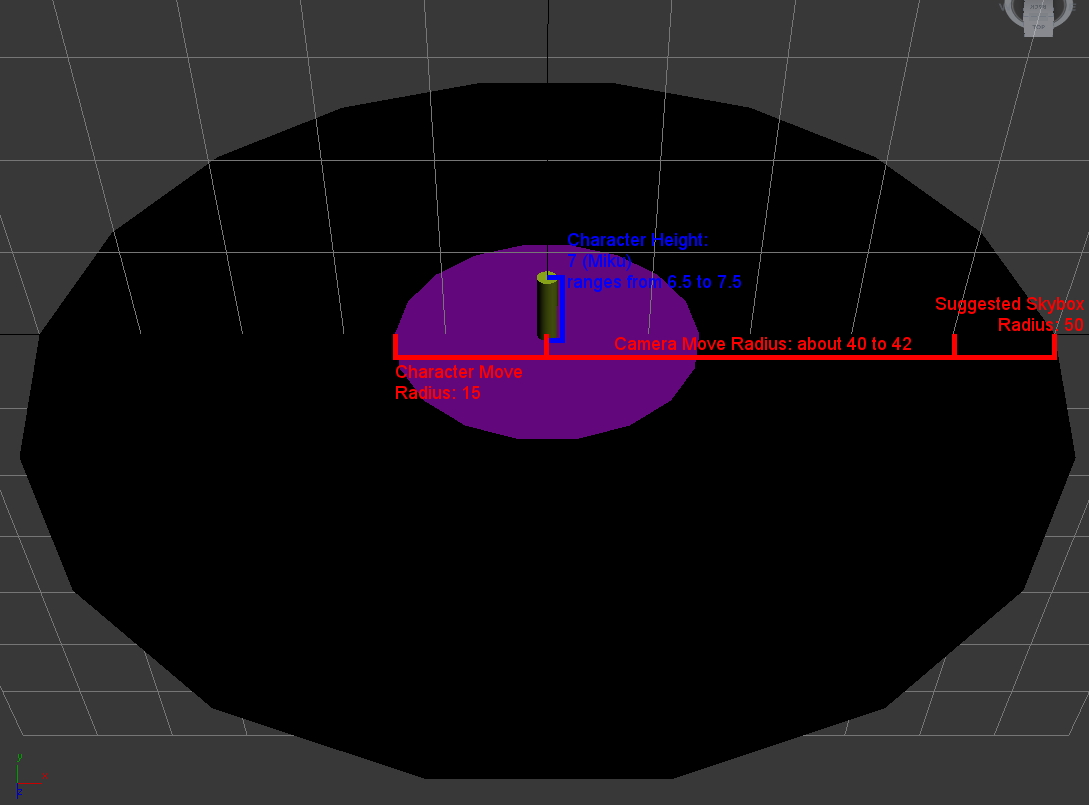 ]]
]]

There are a few sizes you need to remember to create stages in PD. These values are written in 3ds Max units.
Character:
The character heights range from 6.5 (Rin) to 7.5 (Kaito). The average is 7 (Miku).
Characters can be moved in a radius of 15 around the middle point. The Z value can't be changed from 0.
Camera:
Players can move the Edit Mode Camera in a radius ranging from 40 to 42 depending on the exact position. So, a sphere with a radius of 50 would be a good skybox.
Texture, Lightning and Colors
The lightning in PD works pretty simple: There is none. Every face is lit at full brightness.
Untextured faces will be shown as pure black, just like the background in case no skybox is used. Setting a color on an object, like 3ds Max does, will not change the color in PD.
Animation
You have to use bones for animation - while it is possible for some program to do it without them, they are required to in Alchemy.
Converting to DLC
If you want to convert the DLC yourself, you need both an Autodesk 3D program (3ds Max or Maya) and Alchemy. If you do not have both, some people offer a service to convert the stage for you as long you don't ask them too often.Install the plugin you need, and export the stage as an IGB. Next, open it in Alchemy Finalizer. The Viewer gives you a good preview of what the stage will look like - if you are okay with it, rightclick into the "Optimizations to run" field, choose "Load optimization set" and load this file. This will convert all textures so they are displayed ingame. And that is all you need to do - all that is left is inserting the IGB into a Custom Stage EDAT (you might need to change the Table of Contents depending on the file size - there is some info on how the TOC works in this post).


![7.2 Sizes[[file/view/customdlc_sizes.png|]]](#Sizes.5B.5Bfile.2Fview.2Fcustomdlc_sizes.png.7C.5D.5D)